Procesar recepciones y entregas con códigos de barras
The Barcode app can be used to process receipts, deliveries, and other types of operations in real time using a barcode scanner or the Odoo mobile app.
This makes it possible to process operations on the warehouse floor when they happen, instead of having to wait to validate transfers from a computer. This real-time processing ensures barcodes are accurately assigned to the correct products, packaging, transfers, locations, and more, reducing errors and keeping inventory data in sync.
Activar la aplicación Código de barras
To use the Barcode app to process transfers, it must be installed by enabling the feature from the settings of the Inventory app.
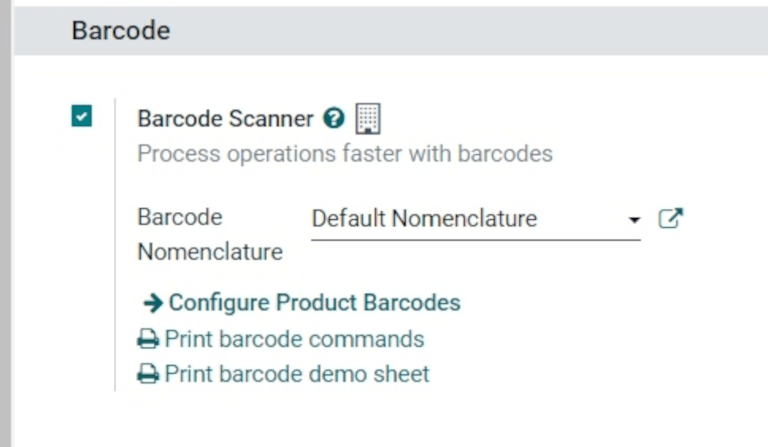
To do so, navigate to . Then, scroll down to the Barcode section, and select the checkbox next to the Barcode Scanner feature.
After the checkbox is selected, click Save at the top of the page to save changes.
After the page has refreshed, a new option is displayed under the Barcode Scanner feature: Barcode Nomenclature (with a corresponding drop-down menu). Select either:
Default Nomenclature: The barcode actions using UPC and EAN, detailed in the default nomenclature list, are available for use. By default, Odoo automatically handles UPC/EAN conversion.
Default GS1 Nomenclature: Scan barcodes of sealed boxes and identify essential product information, such as Global Trade Item Numbers (GTINs), lot number, quantity information, and more.
También hay una flecha de enlace interno Configurar códigos de barras de productos, junto con un conjunto de botones de Imprimir para imprimir comandos de códigos de barras y una hoja de demostración de códigos de barras.
Escanear códigos de barras para recepciones
Purchase orders (POs) are used to process warehouse receipts for incoming products and product packagings. First, create a request for quotation, then confirm it to create a PO.
Consulta
To process and scan barcodes for warehouse receipts, navigate to the app.
Once inside the Barcode app, a Barcode Scanning screen displaying different options is presented.
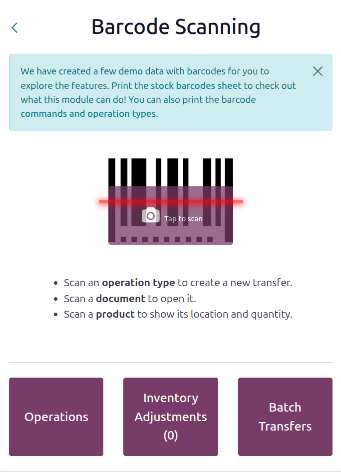
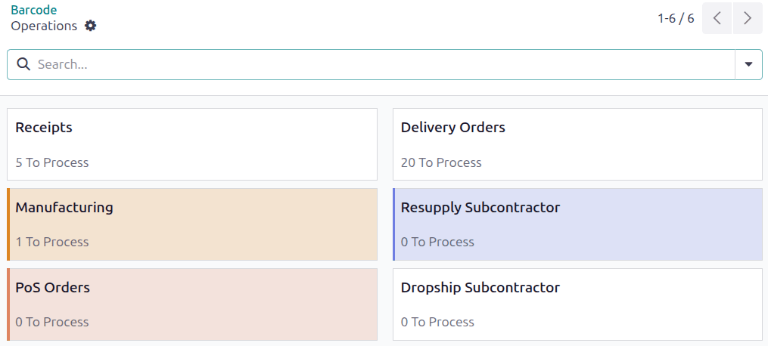
To process receipts, click the Operations button at the bottom of the screen. The Operations overview page opens.
From this page, tap the Receipts card to view all outstanding receipts. Then, select the desired receipt operation to process. This navigates to the barcode transfer screen.
Nota
Si solo está usando la aplicación móvil de Código de barras de Odoo, el código de barras para cada transferencia de un tipo de operación correspondiente se puede escanear para procesarse sin problemas. Una vez que lo escanee, los productos que sean parte de una transferencia existente pueden escanearse y los productos nuevos se pueden agregar a la transferencia también. Cuando haya escaneado todos los productos, valide la transferencia para seguir con los movimientos de existencias.
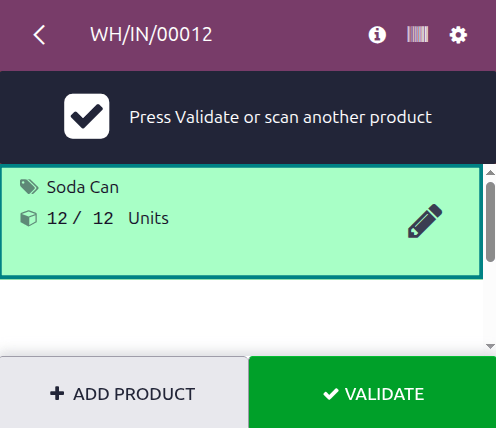
From this screen, an overview of all receipts to process within that transfer (WH/IN/000XX) is shown. At the bottom of the screen, there are options to Add Product or Validate, depending on whether products need to be added to the operation, or if the whole operation should be validated at once.
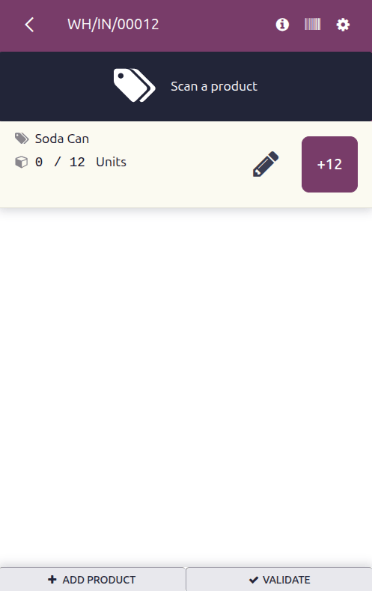
To process and scan each product individually, scan a product or product packaging, or choose a
specific product line. Click the +# button (for example, +10) to indicate receipt of
that product.
Editing a product line
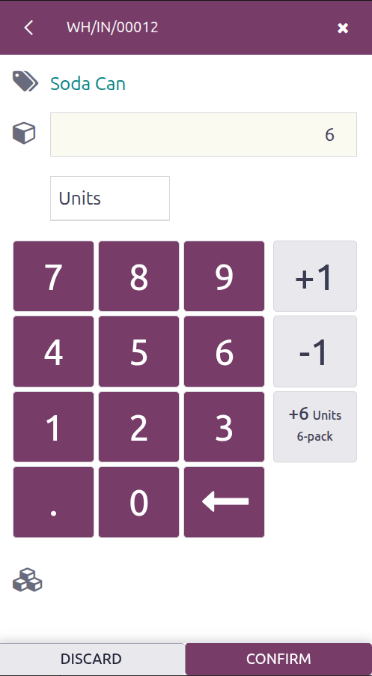
To manually adjust received quantities for a product, click the (pencil) icon to open a new screen to edit that product line.
On this screen, the product that’s being received is listed. Under the product name, edit the
Quantity line. Change the 0 in the line to the desired quantity, or click the
/# Units button (for example, /12 Units) to automatically fill the quantity ordered
from the PO.
Additionally, click the +1 and -1 buttons to add or subtract quantity of the product. Click the +# Units button to add a product packaging. Click the number keys to add quantity.
Below the number keys is the Location line, which reads WH/Stock by default, unless
another location is listed on the product itself. Click this line to reveal a drop-down menu of
additional locations to choose from.
When ready, click Confirm to confirm the changes made to the product line.
Example
In the reception operation WH/IN/00012, 12 Units of Soda Can are expected to be received.
Warehouse employees can scan the barcode of the Soda Can product to receive one unit, or
because they can be purchased in 6-pack packaging, they can scan the packaging barcode.
Alternatively, they can click the (pencil) icon to manually enter
the received quantities.
Validating the transfer
If not all products were scanned or manually entered from the pencil icon, click the +# button on the product line for the products being received.
Finally, click Validate. The receipt is processed, and the Barcode app can be closed.
Escanear códigos de barra para órdenes de entrega
To process warehouse deliveries for outgoing products, a sales order (SO) must be created to create a delivery operation to process. First, create a quotation, then confirm it to create the SO.
Consulta
To process and scan barcodes for warehouse deliveries, navigate to the app.
In the Barcode app, a Barcode Scanning screen displaying different options opens. To process deliveries, click the Operations button at the bottom of the screen. This opens an Operations overview page.
On this page, click the Delivery Orders card to view all outstanding deliveries.
Select the desired delivery order to process. This navigates to the barcode transfer screen.
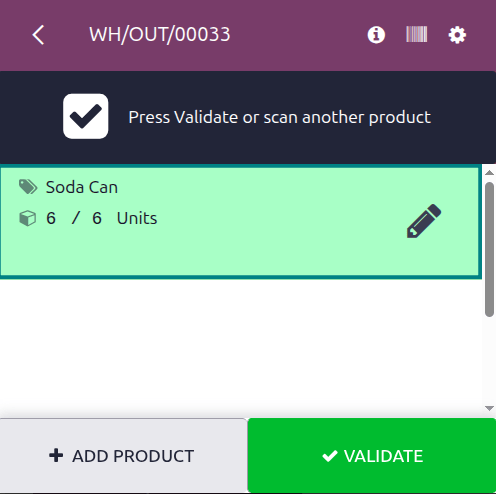
On this screen, review the overview of all products and packagings to process within that transfer (WH/OUT/000XX). At the bottom of the screen, there are buttons to Add Product or Validate, depending on whether products need to be added to the operation, or if the whole operation should be validated at once.
To process and scan each product individually, choose a specific product line. Scan a product or
product packaging, or click the +# (for example, +6) button to indicate delivery of
that product.
Editing a product line
To manually adjust quantities for a product, click the (pencil) icon to open a new screen to edit that product line.
The product that’s being delivered is listed on this screen. Under the product name, edit the
Quantity line. Change the 0.00 in the line to the desired quantity, or click the
/# Units button (for example, /6 Units) to automatically fill the quantity
ordered from the SO. Alternatively, click the +1 and -1 buttons to add or
subtract quantity of the product, and the number keys can be used to add quantity, as well.
Below the number keys is the Location line, which reads WH/Stock by default, unless
the product is stored in a different location. This is the location that the product is being pulled
from for delivery. Click this line to reveal a menu of additional locations to choose from (if this
product is stored in multiple locations in the warehouse).
Truco
For warehouses that have multiple different storage locations, putaway rules, and removal strategies, additional steps can be added for various operation types, while using the Barcode app.
When ready, click Confirm to confirm the changes made to the product line.
Validating the delivery
If not all products or product packagings have been scanned or entered on the overview page, scan the products or packagings, or click the +# button on the product line for the products. Finally, click Validate. The delivery is processed, and the Barcode app can be closed.